
If you happen to have scanned multiple images / drawings / documents / photos into a single PDF, it would be a bit of hassle of split the pages individually. Not to mention optimise the file size will be more troublesome. Here’s how to convert PDF to individual optimised JPG.
Here’s what you can do with tools that you already have on your Mac, and with open source software.
My workflow is batch scanning everything into a PDF at 300dpi. Right click / Control click on the PDF to run Quick Action that I made to batch export each page into a JPG at 300dpi (or whatever dpi that is the same as the PDF itself). And then optimise the JPG with great open source tool, ImageOptim.
First tool – Automator
Automator comes with macOS for so long and has been ignored by most users. It sits right in the Application folder. Open it and create a new document as Quick Action. Though making it Application will still work but it won’t be as direct and handy as Quick Action.

Don’t be overwhelmed by the interface. What you need is simply search for the specific blocks to build like Lego. But first, here’s what it should look like, a blank Quick Action workflow

What you need next is to search for “render”. That would narrow down the blocks in the second column. You should be able to see an item name “Render PDF pages as images”. Drag that to the space on the right column / pane.
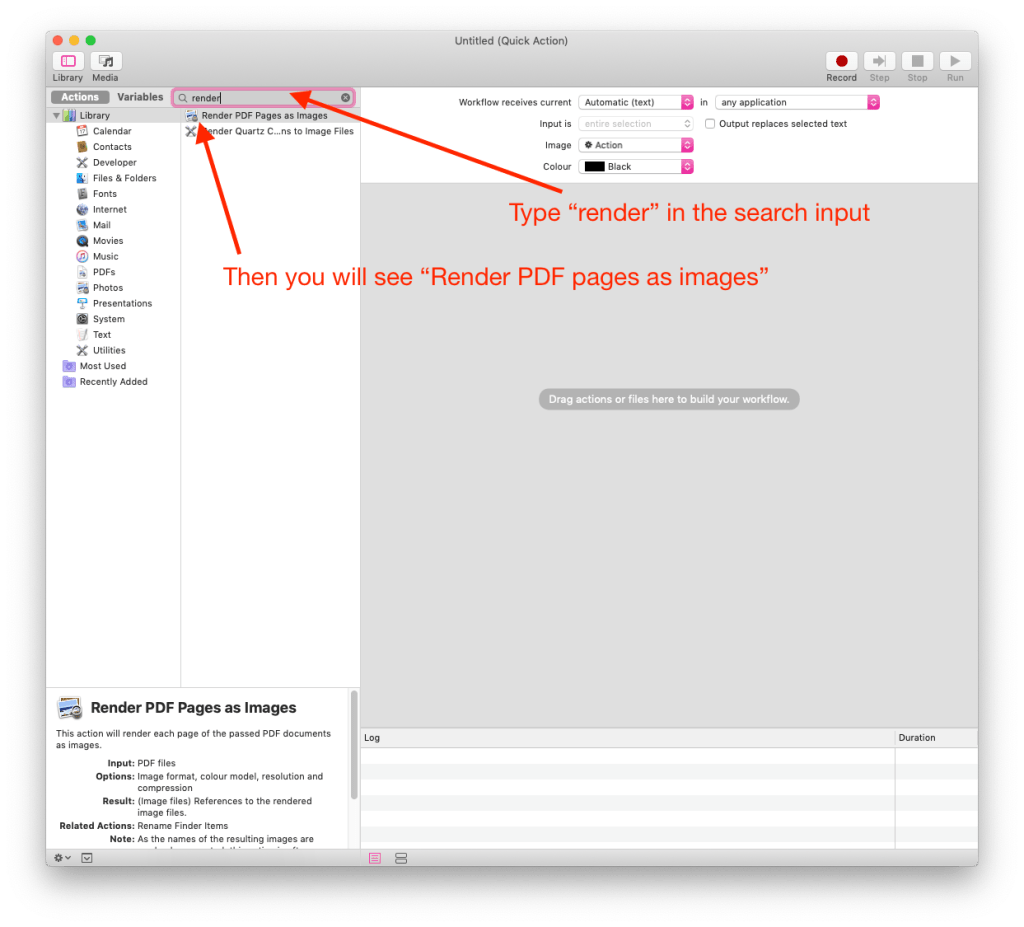
Now you have 2 steps in the workflow. What you want to choose is the Format, Resolution, and Compression. Here I’ve chosen JPEG image for format, 300 dpi to match the same resolution of my PDFs, and BEST for compression (which means the LEAST loss in image quality but large file size).

Now we need to tell Automator what to do with these output images. Type “move” in the search input. Then you should see “Move Finder Items”. Drag this to the bottom to right column/pane.

The default location is Desktop. I’d like the output to be in a JPG folder within my Pictures folder. You will need to create the JPG folder beforehand by selecting “Other…” from the location menu.

We are almost done here. In fact, you can stop here if you don’t want further optimisation of the files. But we’ll go for the extra miles here.

Search for “open finder” in the second column. You will see there is “Open Finder Items” and that’s what you need to drag to the bottom right.

Once it’s in place, you can use the pull down menu to select ImageOptim. If you haven’t downloaded it, yet, grab it now


This workflow is complete and you can save it as “PDF to JPG”. You can quit Automator now.

Before we actually use the workflow, we need to inspect Open ImageOptim’s Preferences.

Make sure to uncheck “Enable lossy minification” in Quality in Preferences. You can quit ImageOptim at this point.

Now in your Pictures folder, you should have an empty JPG folder (or whatever folder name you got on your Mac)

Right-click or Control-click on one or more PDFs, and select Services > PDF to JPG. Wait for the magic to happen. When all pages from PDF(s) are exported as JPG image. The workflow will open ImageOptim to optimise these images. It could take sometimes!

There may be some visual bug of ImageOptim that it doesn’t show the green tick when there are more items below the visual area. When you select all (Command-A), the UI will refresh to show the correct state. When all done, you will have the optimised JPG files in the JPG folder.

In case you wonder where the workflow saved, it’s in ~/Library/Services
In fact, if you open Automator, the workflow is likely kept opened. You can Command-click the title to reveal it’s location too. This is a neat trick inherited from the early days of System 7 if I remember correctly. And you can select “Services” to open the folder in Finder from this pull down menu.

Have fun with Automator and your workflow.